Friday, October 17, 2014

Good Glass is Timeless

A few years ago, I bought a bunch of 35mm camera equipment at a garage sale.  There were some valuable goodies like camera bodies, lenses, flash units and filters among the lot.  I resold most of the gear on eBay for quite a profit.  I kept a few prime lenses for my Olympus DSLR.  I just had to get a lens converter for them.  Now, when you get older lenses that do not have autofocus capabilities or if you have to convert lenses in any way, you most likely will not have autofocus capabilities.  That being said, it was worth it to have some nice lenses in exchange for the inconvenience of having to manually focus.  I reluctantly sold the lenses just recently because I wanted to save up for a newer Canon camera, which I recently purchased.

I bought the Canon 70D kit at Costco.  In many ways, this camera is far superior to my Olympus E-300.  The camera body itself, I mean.  I knew I would be regressing when it came to the lenses though.  Even though the new lenses have image stabilization and some other cool features, they are nonetheless cheap "kit" lenses.  Aside from the older Olympus OM lenses, I had invested in the higher quality Zuiko lenses from Olympus.  Even though Olympus has apparently discontinued their line of E-Series Four-Thirds cameras, the good lenses are still holding their value on eBay.  There is a reason for this.  It's because good glass is timeless.  As long as there are cameras out there that are compatible, the lenses never become totally obsolete, unlike camera bodies.

One of my benchmark tests for lenses is when you shoot the moon.  Photographing the moon can be tricky because there are so many factors that come into play. I have started a technical article on shooting the moon, but I haven't posted it yet.  Stay tuned for more detailed information. Suffice it to say that this is an area where the defects can be quite revealing.  In photography, you generally want your equipment to be "transparent" or in other words, you don't want your limitations to be revealed.

So without further ado, I will compare the differences:

This is the shot I took of the moon with my Olympus E-300 with the 55-200mm lens racked all the way out.  I cropped the picture so that I could get the moon to fill the frame.  In doing so, you start to see the pixels, especially at the edges where bright meets darkness.  You will also notice something... or not notice something when I compare the photo to the one shot with the Canon 70D.


This photo was taken with the Canon 70D racked out all the way to 250mm.  You can see more detail but around the edges you will see chromatic aberrations (unnatural coloring due to properties of the glass in the lens).

The perfect combination would be a good camera body with a professional lens.  If there is anywhere you want to spend the most money, it would be in your lenses.  Professional photographers spend far more on their lenses than the camera bodies.  In fact, I will spend twice as much money for a high-quality Canon zoom lens than I did for the entire 70D camera kit, but it will be worth it.  Another investment (that is actually a compromise) is to get a doubler.  What this does doubles the focal length of your lens.  This will enable you to get closer without digitally zooming in post production.  Your limitations will be in your glass and not in your processing software, so any details you will lose will be in clarity and not with revealing digital pixels.

I intend to post more detailed information on shooting the moon in a future blog post.


Wedding photography prices
Image courtesy of: SnapKnot - Wedding photography prices

Monday, February 24, 2014

How To Spot An Amateur Photographer

Here is a partial list of common factors that seasoned and professional photography critics look for (or see without even looking for) when viewing photographs.  I will have to say that many professional photographers are quite anal retentive when critiquing photos, but hey… I don't make up the rules and I don't always agree with them 100% of the time, but here they are:

1) In scenic shots, the horizon is perfectly centered in the screen.  I've heard several professional photographers talking about this (while rolling their eyes).  For some reason, most of us tend to want to center the horizon, but in reality there is really nothing that interesting about the horizon itself.  There are a few exceptions, but in the vast majority of shots either the sky or the landscape draws more interest.

2) Your subject is perfectly centered in the photo.  Professional photographers will tell you that such photos are boring.  They may be appropriate for product shots and engineering demonstrations, but not for artistic photographs.  Learn the rule of thirds.  This applies to #1 as well.

3) The subject is blurry.  There are several reasons why a photo might be blurry.  On of the most common reasons is because it is not perfectly in focus.  The other is that your subject (or the photographer) moved when using a slow shutter speed.  Not knowing what shutter speed means is a definite sign you are an amateur.  Sometimes, your auto-focus keys in on something other than the main subject.  This is bad.  Professionals know how to focus their subjects - tack sharp.

4) The photo is not level.  If there is a sharp horizon in your photo and it is not aligned with that horizon or if there are vertical indicators such as trees, walls, window sills or doors or other known objects that are level or plumb but there is a even a degree or two of discrepancy between your picture and those, then your picture is not level… and it will bug the heck out of photo critics.

5) Your subject is too far away… sometimes even lost in the scenery.  Take a look at just about any professional photograph and you will see that the subject is almost invariably very close.  The amateur mind tries to get too much in the photo… too much scenery or too many other people or whatever, in the attempt to try to tell a better story but the opposite effect happens - the viewer is confused as to what the story actually is when there is too much going on

6) Your photo does not tell a story.  A good photograph tells a story.  The viewer can look at it and describe what is going on or what message it is trying to convey.  With the exception of certain portraits and model photos (and even then, in such events, your photos can really come alive when there is a theme or story), photographs are pretty much meaningless or confusing without something that the viewer can describe.  Photos of people just standing or sitting there do not convey a very strong message.

7) The white balance is off-kilter.  There are two extremes in white balance.  On the "cold" side, the photos are too blue.  On the "hot" side, the photos are too yellow, red or orange.  Professional photographers know how to adjust the white balance to compensate, especially in difficult lighting situations.  Many pros shoot in RAW and then can have the option to adjust the white balance in Photoshop.  There are ways to color correct when shot in JPEG, but you can get more accurate results by adjusting a RAW photo.

8) Quantity of photos vs. quality.  It is probably a common belief among amateurs that out of hundreds (or thousands) of snapshots, you will probably get a few that "turn out right."  Photography is an art that requires paying attention to detail, a knowledge of technical aspects of the camera and the scene being shot as well as tactical skills.  I'm sure the amateur method works out for some people sometimes, but wouldn't you rather know how to work with your camera, your lighting, your subjects and the scene rather than just guessing and hoping for the best?

9) Equipment. I've seen some surprisingly good photos taken on sub-par cameras (phone cameras and point-and-shoot cameras).  Many of these are by accident, but even pros will often carry an "amateur" camera with them… but knowing how to get the optimal photo from even poor quality equipment can make all the difference in the world.  On the other hand, believing that you can get a professional quality photo from a low quality instrument is pure fantasy.

10) All the photos are shot in an automatic setting.  I think it's funny to see amateurs out there with a $2000 camera, afraid to explore any other settings besides automatic.  Just reading the manual would benefit the user a great deal.  That's one of the first things I recommend to anyone who has gotten a new piece of equipment.

11) Misuse of the flash.  When the subject is too close, too far away or when a flash is not necessary.   Some people are not even aware that their flash is on nor do they know how to disable it.  A pop-up or built-in flash is almost never used or necessary on a professional camera.  Some higher-end cameras do not even have built-in flash units because professionals use off-camera (hot-shoe mounted) flash units or other external lighting.

12) The lighting is all wrong.  Photography is all about light and when the lighting is ideal then that makes for ideal photographs (provided that other elements are also added).  When the lighting is wrong, it makes for amateur photographs.  Many amateurs shoot in the middle of a sunny day.  After all, isn't that when you have the most light?  Too much of a good thing is bad though - it is bright and it is stark and there is only so much you can do in Photoshop.  One can write an entire volume on proper lighting, but suffice it to say that an amateur photograph with poor lighting (when lighting could have been better) is easy to spot and oftentimes the mistakes are easy to remedy by making some minor adjustments.

Well, there you have it.  I'm sure there are more that I can come up with, but this will give you some things to work on.  These are by no means an instruction guide… just a few indicators.  Entire chapters - or books - can be written on each of these subjects.  Once you are aware of what is going on, you will be able to see what I am talking about too… and become a photo critic yourself!

Monday, June 4, 2012

Why Are My Pictures Blurry?


There are several main reasons why a digital photograph might lack sharpness.  First of all, let’s make a distinction between “blurry” and “grainy.”  Just to keep things simple, I will use those two terms for now.  Let’s start with “grainy” and get it out of the way.  Graininess, or more properly, digital noise is introduced when a high ISO is used.  When taking photos, you want to use the lowest ISO possible, as a general rule.  I will reveal why this is in a later essay because it is somewhat complex (where I will cover ISO at length), but for now just remember that higher ISO = more digital noise.  Another source of “graininess” is when a lower resolution (quality) is chosen.  There is a setting on practically every digital camera where you can make a selection between varying quality of images.  You might wonder why a person would choose a lower quality at all.  The reason for this is that the lower the quality, the more pictures you can hold on your memory card or subsequently your hard drive.  So it’s a trade-off: you get more pictures for your buck, but then you sacrifice quality.  The reason for this is that for higher quality photos, there are more pixels per inch – meaning that the individual pixels are actually physically bigger.  Each pixel is a little different colored square or block that makes up a part of a complete picture.  It’s basically a mosaic.

Now let’s talk about blurry.  There are three main reasons for a picture being blurry: 1) movement, 2) camera is out of focus or 3) obstruction somewhere between your subject and the camera’s sensor.

Movement (or motion)
Motion blur shows movement
Motion might be from your subject or your camera – or both – at the moment the shutter is open.  Motion blur is sometimes desirable (when used correctly and appropriately) because it demonstrates a more natural appearance of motion, as opposed to an object or person being “frozen” in action.  Other than that, motion blur is usually not preferred.  There are a couple of ways to prevent unwanted motion blur: 1) You can take measures to keep your camera and subject from moving.  This can be accomplished by practicing better shooting techniques (learning to depress the shutter release button without moving the camera) and/or by using a tripod or some other means to steady the camera.  2) Increase the shutter speed of the camera, which may require you to increase ISO and open your aperture – which increase the chances of noise and blur if not used correctly.  I have already mentioned the use of higher ISO, but not wider aperture.  A wider aperture (lower f-stop number) decreases the depth of focus, so in such instances if your area of focus is off just a little bit, some essential parts of your subject will be blurry (out of focus).

Out of Focus
This is a perfect example of a photo lacking composition and 
focus.  Nice picture of the couch! 
One thing that I find quite often with amateur photographers is that they just can’t wait to press the shutter button… even if the shot isn’t composed or if the camera isn’t focused or ready.  Instead of getting a half-dozen good photographs, you end up with a hundred snapshots.  I have overheard amateurs discussing the “advantage” of digital photography is that you can shoot a whole bunch of shots and you get a few that turn out looking nice.  This shotgun approach to photography rarely gives satisfying results (from my perspective anyway).  One of my friends who is friends with a professional photographer told me that the pro ALWAYS comes away with professional looking photos.  The reason why is that he knows how to set up the shot BEFORE fully depressing the shutter release button.  It may only take a fraction of a second (for a seasoned photographer) but ensuring that the lens has focused on what it is supposed to focus on, the lighting is properly compensated for and that the shot is composed makes the difference between a professional photograph and a blurry snapshot.  On most DSLR cameras, there is an indicator that tells whether the lens is focused or not.  Some lenses take awhile to autofocus.  In some cases, it may be necessary to override the autofocus and manually focus.  One rule of thumb when photographing people or animals is that to ensure the eyes are in focus – tack sharp.  Other features are much more forgiving.  This is especially important when using a wider aperture.

Obstructions
Leaf or branch obstructing view of frog, causing 
undesirable blur
I’ll give a broad, general term to the word obstructions because basically it is any foreign matter that doesn’t belong in-between the subject or the sensor.  It could be dust, smudges or scratches on the lens or maybe your finger or camera strap is in the way.  You may be trying to shoot through a dirty window or window screen.  It could also be tall grass or branches that are in the way.  One thing also to consider is that your camera’s sensor will eventually get dust on it.  My recommendation is to get it professionally cleaned.  Don’t ever use sprays, solvents or compressed air.  You could ruin your camera.  Sometimes, even though obstructions are not necessarily visible, they will have a profound affect on the sharpness of your photograph.

So there you have it, in a nutshell.  It gets a lot more complicated, but if you know where the problems lie, then you can go into greater depth to try to solve those problems and work toward being a better photographer.  Simply being aware and taking a little bit of time and mental awareness in this matter will IMMEDIATELY give you dramatic improvement in your photography skills.

Friday, August 12, 2011

My new toy - Fujifilm Finepix XP20

A lot of people I know will turn their heads and stare at a flashy sports car or a nice boat.  Not that I don't appreciate those fine items, but maybe they just don't catch my eye as much as a couple other items do: Guitars and cameras.  Since this blog is about photography, I'll dispense with my feelings about guitars... for now.  And as far as cameras go, I'll usually ignore the compact, or point-and-shoot cameras.  If you'd compare them to cars, they'd all be like the conventional economy cars like a Toyota Camry... there's a million of them and nothing really exciting about them.  But then, along comes something radically different like a Scion Cube.  It's certainly not a sports car, but it is a head-turner.  

That's the way it was for me with this camera:

I was invited on a hike to Mount Constitution for Girls Camp this summer and one of the girls was using one of these.  Immediately, I saw that it not only didn't look like a conventional compact camera, but it also looked solid.  I asked to see it and found out that it was waterproof, shockproof, dust and freeze proof.  Now that really caught my interest.  I asked her where she got it and she said it was at Costco.  Costco?!?!?!  Why didn't I see that there when I bought my point-and-shoot?  I was envious!  I asked how much it cost and it wasn't much more than I spent on my Nikon S220.

I did my research on this camera and found that it was designed for underwater use (not just weather and dust resistant, as some cameras claim).  It is sealed from the elements.  The lens movement is contained within its protective casing.  I also found out that the camera is capable of 14MP, has a wide angle lens with 5x optical zoom and takes HD 1280 video.  Now I was REALLY interested (and still envious).  

Well, I didn't have to be envious very much longer.  Rather impetuously, I bought one of them.  I was walking through Costco and they happened to have a $40.00 rebate on them that expired that weekend.  At that point, the only decision was: What color?  The camera comes in several flashy colors: black, silver, blue, green and orange. All the ones I could see were black, so I dug underneath the top box and found the ones with color.  Blue... it was definitely going to be blue for me!

So, after using this camera for about a month now, I have some good things to say about this camera and maybe a few concerns.  First, I will say that the video function, especially underwater video, was a major attraction.  Check out this video where I dropped it in while in a rubber raft in Lizard Lake (video quality is diminished because I compressed it to upload it):
Now, how cool is this?  Now, I not only have a camera that I can truly take anywhere, but it can fully function underwater as well.

As far as photo quality, it is about on-par with any typical point-and-shoot camera in its class.  It still doesn't have the capabilities of a DSLR, but that shouldn't be expected either.  I shoot in 640 video because it is jittery when I play it back on my computer and I really don't need widescreen for most of what I do anyway.  I would rather be able to play it back without problems.  

Now the concerns:

First, the camera takes some getting used to.  Being where the lens is located, I can almost guarantee that you will get your fingers in front of the lens for some shots.  The zoom control is kind of weird.  It is a little switch on top of the camera that is awkward to use.  You don't want to zoom while you are shooting video because the auto-focus lags and your image will be blurry for a half a second or so and the lens motor is noisy and you will hear it in the audio.  The video button is conveniently located to where you can just press the button to start the video.  It is also kind of awkward, especially when you go to stop the video (using the same button).  

The camera makes annoying beeps and clicks when you use it.  The problem is that if you turn it to "silent" mode, you can't use the flash or some of the other important functions.

The camera is rated for underwater use.  I took many pictures and videos on a trip to Deception Pass.  I had it in the lake, in the salt water and it went with me while I hiked, kayaked and jogged.  Towards the end of the day, I noticed that the protective lens was starting to fog up on the inside.  I don't know if this is a common problem, but it could be a major concern.  That means that there is possibly some moisture getting inside the camera.  I opened it up and used the hand dryer at the public restroom.  That seemed to clear it up.

The neoprene carrying case holds the camera snugly and securely, but getting it in and out is kind of a pain.  The cover wraps over the end, going through a hole in the case.  I expect this to break soon... just based on the way it is designed and the amount of stress it goes through to pull the rest of the case through this hole.  

Aside from those concerns, I still love this camera.  It was worth what I paid for it.  I hope to enjoy this camera for years to come!  Unfortunately, there is no $40.00 rebate anymore.  Currently, they have a $20.00 rebate off the $179.00 price, but even still - without the rebate, I think I would still buy it at full price.    

My next DSLR camera...

Choices, choices... mostly dictated by $$$.  I've been trying to save my money for awhile now and I've been approaching the critical point of making a decision as to which camera to buy.  I'm about halfway there if I want to get a Canon 60D kit with an 18-200mm lens.  A decent starter kit in the Canon line... and doable.  I really had my sights set on a Canon 5D Mark II with a pro-quality zoom lens - or better yet, a Canon 1Ds Mark III body, BUT then reality sets in.  Sigh...

Then, I start looking at Nikon.  There are some other bodies and lenses that are comparable in price to the Canon 60D kit like the D7000 - with comparable features.  I then start looking at the D300, which edges more into the pro arena, yet is considerably less than the Canon 5D Mk II.  The D300 kit (with an 18-200mm lens) will keep me saving my money for a little while longer, but then it's getting closer to what I really want.  Then the next big jump would be the Nikon D3s or D3x.

I guess, the bottom line is whether I want to start in the Nikon or Canon line.  Eventually, I'll probably want to have two camera bodies anyway.  It just makes good sense when you are on a shoot (like a wedding) to have  two different cameras - one for one lens and one for another type of lens... or one with low-light settings and the other with a flash.  It's almost like having two photographers there (but not quite).  It's also wise just to have a backup camera in those type of events just in case something happens (and I've had some pretty upsetting stuff happen to my cameras and lenses recently).

Well, I still have a little time to work with... but until then I'll keep wracking my brain and teetering back-and-forth.

Monday, July 11, 2011

Take Time to Photograph the Flowers!

Cherry blossoms

... or anything else, for that matter.  Which means, bring a camera (a real camera) with you EVERYWHERE.  Look at your surroundings and see things as you would through the lens of a camera.  If this is difficult for you, just take pictures of random stuff.  Try different angles, heights and dimensions.  Use wide-angle lenses and telephoto lenses.  Experiment with your photography and look for things that often get forgotten.  I have a penchant for vintage and abandoned machinery and buildings.  Some of this stuff is half-buried in bushes, mud or moss.  It may be considered ugly by many people, especially in its context but when isolated from the surroundings it becomes a work of art.  Your photography work may never be worthy of glossy magazine-type material or stock photography, but perhaps it means something to you.  If nothing else, follow your passion for you, the photographer... because those flowers will wilt, old buildings get bulldozed over and old cars get towed off and recycled.
Old car with lichen growing on it - Oak Harbor

Monday, June 20, 2011

The Exposure Triangle

The exposure triangle (as it is known) is a very important concept in photography.  It is not a hard and fast adjustment graph, but simply a way to better understand exposure.  The earlier a person can learn this, the less frustration there will be in having properly exposed photographs.  I have hesitated to post this article for a couple of reasons. 1) Because I feared that I may not have been able to bring this concept down to a level that is easily understood, since there is a balance between providing just enough information and in the right context to make it meaningful vs. possibly confusing the readers with too much information presented in a complex fashion. 2) There were some questions that I had still... some gaps that needed to be filled in order for me to understand it fully and more accurately in order to present it properly.

Let me first show the diagram and then explain how it works.

In order to fully understand exposure, it will be necessary to study each of the elements that make up exposure.  For this article, I won't go into extreme detail.  I intend to break each of these down later though.  For the time being, it is important to understand that each of these elements (ISO, Aperture and Shutter Speed) affect exposure in a different way.  What is exposure?  Exposure, in photographic terms, could be described as the amount of light that is used to capture your image.  Each of these elements controls the existing light entering or affecting your camera's image sensor.

ISO
ISO stands for: International Standards Organization.  It's really meaningless, as pertaining to photography, so don't get hung up on why it is called that.  ISO is also interchangeable with the older and much less frequently used ASA (American Standards Association) which is equally meaningless. There is also another even less frequently used term: DIN (which you may or may not come across) is an older German standard.  Most (if not all) modern cameras use ISO as a standard.  The only thing you need to remember is that ISO is a measure of sensitivity.  In film cameras, it was the measure of the sensitivity of the film to light.  In digital cameras, it is a measure of the image sensor's sensitivity.  The lower the number, the less sensitive and the higher the number the more sensitive.  ISO "stops" are normally incremented by doubling starting with 100 and going on up from there.  So a conventional camera will have: ISO 100, 200, 400, 800, 1600... and so forth.  Your camera may have less than 100 or more than 1600.  Each of these "stops" will effectively either double or halve the overall Exposure Value (EV) or in other words there is twice as much exposure (light) or half as much light that is used in exposing the photo.  Increasing the ISO will allow you to take pictures in darker situations, but there is a trade-off (there is always a less-desirable trade-off).  In digital cameras, the trade-off is with higher ISO pictures you get what is called noise.  In film, we had a similar effect which was that it made the picture grainy.  Noise makes your pictures "fuzzy" and therefore tend to lack sharpness.  Noise is also manifest in microscopic colored specks, especially in the shadows where there is no detail.  If you increase ISO, it will allow you to use a higher aperture setting and/or faster shutter speed (refer to the exposure triangle).

Aperture
The word "aperture" literally means hole - and that is what it is.  Your eye has a visible aperture (the iris) that automatically adjusts to lighter or darker conditions.  In a camera, there is a device that functions exactly like the iris in the eye.  The hole or opening can be adjusted to allow more or less light through.  The thing to remember (which may be confusing to some) is that the lower the number, larger the opening or the more light is allowed to come through but the higher the number the smaller the opening and less light is allowed to come through.  The term "f-stop" is interchangeable with aperture.  The aperture is a function within the lens, not the camera itself.  The overall Exposure Value (EV), which is measured in "stops" effectively doubles or halves, based on full f-stops of the aperture.  Typically, these values range as follows: f/2.8, f/4, f/5.6, f/8, f/11, f/16 and f/22.  Some lenses have a greater range.  The lower number (or wider aperture), usually the higher quality the lens.  Most lenses will close down to f/22 and is not a challenge to do so, but to have a wider aperture (or lower f-stop number) it is more challenging and the expense goes way up with those higher quality lenses.  A lens with a wider aperture is also called a "fast" lens.  The reason being is that it allows a photographer to use a faster shutter speed.  It will also allow you to lower your ISO.  The trade-off of using a lower f-stop (wider aperture) is that your depth of focus becomes shallower.  This can be a good effect - when used properly and in the right context - but it is not always desirable.  Understanding when and in what applications to use different aperture settings (rather than only for the convenience of optimal lighting) is a trait of a seasoned and skilled photographer.

Shutter Speed
The time that your shutter is opened, allowing your image to "burn" into the image sensor, is determined by the shutter speed.  Shutter speed is determined in seconds or fractions of seconds.  Standardized settings for shutter speed are: 1 s, 1/2 s, 1/4 s, 1/8 s, 1/15 s, 1/30 s, 1/60 s, 1/125 s, 1/250 s, 1/500 s and 1/1000 s.  These indicate full "stop" or allowing your shutter to effectively expose your image either roughly twice or half the value of the former or latter setting.  Most cameras will have settings in-between and outside the boundaries of these standard settings though.  The shutter speed will potentially have the most dramatic (or damaging) effect on your photograph.  With slower shutter speeds (the commonly accepted speed of 1/60 s is the cutoff) you will most likely need a tripod.  With longer lenses, the need becomes greater.  The reason for this is that you move while you are taking pictures and even the slightest movement will cause your picture to be blurred.  Motion blur can be used as a positive effect, but it is necessary to learn how and when to use a slower shutter speed (and what shutter speed to use) to get the best effect.  So, the trade-off for adjusting to a slower shutter speed is possible blurry pictures.  When using lower shutter speeds you can decrease your ISO setting and/or close your aperture (higher f-number).  When using higher shutter speeds, you may have to use a lower ISO and/or wider aperture (once again, refer to the exposure triangle for better understanding).

Exposure Value
The overall Exposure Value (EV) is expressed in positive or negative numbers.  The positive numbers are overexposed, while the negative numbers are underexposed.  When the principles of exposure are properly applied (as shown in the exposure triangle) the photograph will be properly exposed.  A properly exposed image will measure "0" on on the EV scale.  Digital SLR cameras have built-in light meters that will show something that may be a variation this:
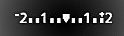
A light meter will appear either on the LCD screen or in the viewfinder, or both.  On the light meter, the exposure is usually expressed in increments of thirds.  Sometimes the exposure is expressed as a positive or negative decimal number.  Notice that in this example the diamond is at 1-2/3 - or in other words it is 1-2/3 stops overexposed.  In order to adjust this to proper exposure, it will be necessary to either: decrease ISO, close your aperture (smaller f-number) or decrease the shutter speed - or perhaps an adjustment of two of them or all three.  This light meter is usually measured Through The Lens (or TTL) so the light is as the camera sees it.  There are some things that can affect the overall Exposure Value (EV).  If you use a lens hood, it will prevent unwanted light from entering the lens, thus allowing you to have a more accurately measured EV and providing you with not only a properly exposed photo, but one that is clearer with less probability of lens flare or an overall bright haze or fog.  When using attachments such as filters, teleconverters or other lens glass, you also reduce the EV.  Some of these will significantly reduce your exposure - even by one or two stops - so when you are shooting in lower light conditions you may want to remove any of these attachments.

This is a general overview of exposure using the exposure triangle - without going into too much detail.  There are some conditions where the rules get complicated or may not even apply - such as when you are using a strobe-type flash (strobe is momentary light flash).  There are some "smart" flash units that will compensate for existing EV so you don't have to calculate to adjust your camera settings and flash manually.  It is also important to note that your camera can often be "fooled" into improper exposure settings.  This is why it is valuable to understand proper exposure and what makes up exposure.  When using an automatic setting, your camera takes an average of what it senses throughout the entire field of view (everything within the viewfinder).  When there is a large area that is either very bright or very dark, your camera will add those to the summation of the average and give you a false exposure reading.  By learning how to shoot in either manual mode or a semi-automatic mode (such as Aperture Priority or Shutter Priority - "A" or "S" respectively, indicated on your camera's Mode dial), you will not only be able to properly expose your photos, but you will be able to fine-tune your camera for capturing images the way YOU intend to - not as a generic automatic setting.  You will unlock the true potential of your camera... and YOUR artistic ability.

One last note.  I used the word "stop" numerous times in this article.  In the literal sense, a full-stop means one full increment in Exposure Value - or a multiplier or divider as to how much light enters the camera.  The word itself is a throwback from the film days of photography - where dials and lens rings actually had detents on them that "stopped" at a certain value.  Even though most cameras now either have screen menus or variable adjustments that don't have such detents, it is still a significant and important term that has not given way to obsolescence.  You will find that there are many such terms in photography.  You can either choose to ignore the original meaning and just commit these terms to memory or if you so desire you can look up the original meaning, if that helps you to further comprehend what it means.